Quick Start Guide: Difference between revisions
| (53 intermediate revisions by 3 users not shown) | |||
| Line 1: | Line 1: | ||
This article covers the very first steps of progression, explaining how resource extraction and machines work, and how to build a small starter factory. | |||
New players are also encouraged to familiarize themselves with the [[Interface]] and [[Hotkeys]] articles. | |||
== | __TOC__ | ||
== Manual Resource Collection == | |||
This section explains how to manually gather the resources required for early progression. | |||
=== Finding Your Way === | |||
During the early game, you will need to collect several resources manually. | |||
To avoid getting lost, use the map by pressing '''M'''. | |||
If you do lose your way, press '''Escape''' and select '''Teleport to Home'''. | |||
This will instantly return you to the [[Spawner]] on your starting platform. | |||
=== Collecting Copper Ore === | |||
First, collect at least '''50 units of copper ore'''. | |||
Both [[Malachite Ore|Malachite]] and [[Chalcopyrite Ore|Chalcopyrite]] can be used, as they contain copper. | |||
These resources can be found in several forms: | |||
* Resource clusters, visible on the map and on the compass | |||
* Surface deposits directly in the terrain | |||
Malachite surface deposits are '''green''', while Chalcopyrite deposits are '''reddish-orange'''. | |||
Both clusters and deposits can be mined using the [[Multitool]]. | |||
However ore clusters never deplete when mined manually, but surface deposits are depleted when you dig them up. | |||
=== Collecting Fuel === | |||
Next, collect '''30 units of any fuel'''. | |||
The best fuel options at the start of the game are: | |||
* [[Logs]] — obtained by cutting down trees | |||
* [[Coal Ore|Coal]] — mined from clusters or surface deposits, similar to ores | |||
=== Returning to Base === | |||
After collecting the required resources, return to your base manually or by using '''Teleport to Home'''. | |||
You are now ready to begin building your first machines. | |||
== Smelting Copper == | |||
This section explains how to smelt copper and produce your first metal plates. | |||
=== Preparing Stone === | |||
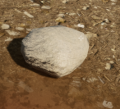
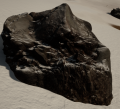
At the start of the game, you have access to 99 units of [[Stone Surface|stone]], which is sufficient for early progression. | |||
If you need more stone, you can: | |||
* Mine stone rocks scattered across the world | |||
* Dig underground until you reach the stone layer | |||
<gallery> | |||
File:First_Steps_Stone1.png|There are small stones. | |||
File:First_Steps_Stone2.png|There are also large stones. | |||
File:First_Steps_Stone4.png|But there is still more stone underground. | |||
</gallery> | |||
Note that the [[Building Material]] recipe requires '''white stone'''. | |||
Red or dark stone variants cannot be used for this recipe. | |||
=== Crafting the Furnace and Smelter === | |||
Return to your base and open the Inventory by pressing '''E'''. | |||
In the '''Catalog''', select the '''Unlocked''' tab. | |||
In the '''Stone''' category, craft the following machines by clicking on them with the '''Left Mouse Button''': | |||
* [[Stone Furnace]] | |||
* [[Stone Smelter]] | |||
Crafting progress is displayed in the lower-left corner of the screen. | |||
By clicking on an item currently being crafted, you can cancel its production. | |||
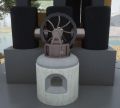
=== Placing the Furnace === | |||
[[File:First_Steps_PlacingFurnace.png|right|thumb|Working Furnace & Smelter]] | |||
Select the '''Stone Furnace''' in your Inventory and close the Inventory. | |||
You will see a placement preview of the furnace. | |||
To rotate the preview, press '''R'''. | |||
Choose a location on your platform and place the furnace using the '''Left Mouse Button'''. | |||
If you are not satisfied with the placement, you can always remove the machine using the Multitool. | |||
Notice the '''red circle''' on top of the furnace — this is its '''heat output'''. | |||
=== Connecting the Smelter === | |||
Next, select the '''Stone Smelter''' in your Inventory and place it directly on top of the furnace. | |||
This connects the heat output of the furnace to the heat input of the smelter. | |||
The furnace will now supply heat, allowing the smelter to operate. | |||
==== Machine Inputs and Outputs ==== | |||
''Tip:'' All machines have inputs and outputs. | |||
* Inputs are usually displayed with a '''solid outline''' | |||
* Outputs are usually displayed with a '''dashed outline''' | |||
However, '''heat, kinetic, and electrical outputs''' are always shown with a solid outline. | |||
The machine tooltip clearly indicates which resources the machine accepts and which it outputs. | |||
=== Smelting Copper === | |||
Finally, open the '''Stone Smelter''' using the '''Right Mouse Button''' and place the mined '''copper ore''' inside it. | |||
Place '''Fuel''' into the '''Stone Furnace'''. | |||
If everything is set up correctly: | |||
* The furnace will light up with a fire animation | |||
* Molten metal will flow inside the smelter | |||
* The smelter recipe progress bar will begin to fill | |||
Once the progress bar is complete, you will receive the final product — a [[Copper Plate]]. | |||
== Researching New Machines == | |||
Before you can begin research, you must build and power a [[Computer]] so that it can start generating '''Computation'''. | |||
=== Preparing for Research === | |||
Wait until at least '''23 Copper Plates''' have been smelted, then collect them. | |||
After that, open the '''Catalog''' and craft the following machines: | |||
# [[Stone Furnace]] | |||
# [[Copper Stirling Engine]] | |||
# [[Copper Compact Generator]] | |||
# [[Copper Computer]] | |||
=== Building the Research Setup === | |||
Now place the machines in sequence, matching their inputs and outputs by color. | |||
# Place the '''Stone Furnace'''. | |||
# Place the '''Copper Stirling Engine''' on top of the furnace. | |||
# Attach the '''Copper Compact Generator''' to the Stirling Engine, connecting the '''yellow output''' to the '''yellow input'''. | |||
# Finally, place the '''Copper Computer''', connecting the '''blue output''' to the '''blue input'''. | |||
Insert '''Fuel''' into the furnace at the bottom of the structure. | |||
Once powered, the computer will begin operating and generating Computation. | |||
[[File:First_Steps_ResearchSetup.jpg|thumb|center|700px|Early-game research setup]] | |||
=== Unlocking Research === | |||
Open the Research tree in one of the following ways: | |||
* Click the '''Research''' button in the lower-left corner of the screen | |||
* Press the '''J''' hotkey | |||
Your primary goal is to research '''Automatic Mining'''. | |||
However, this technology is locked behind other research nodes, so you must unlock them first. | |||
Follow this order: | |||
# Select '''Basic Machines''' and click '''Start Research''' in the upper-right corner of the screen. | |||
# Add '''Automation''' to the research queue. | |||
# Add '''Automatic Mining''' to the research queue. | |||
Once all required research has been queued, all that remains is to wait for the research to complete. | |||
Note: completed research are displayed in '''green'''. Queued research are '''blue'''. Unavailable research are '''red''', and '''orange''' indicates research that can be completed because their dependencies are queued. | |||
A small blue "i" icon on a research item indicates that it is required to open the [[Portal]] - thus completing the game. | |||
== Automatic Mining == | |||
After researching '''Automatic Mining''', you gain access to automated ore extraction. | |||
From this point on, you no longer need to mine ores manually. | |||
== | === Preparing the Machines === | ||
To set up automatic mining, craft the following machines: | |||
* [[Stone Furnace]] | |||
* [[Stirling Engine]] | |||
* [[Drilling Rig]] | |||
* [[Stone Chest]] | |||
=== Finding a Copper Cluster === | |||
Open | Open the map by pressing '''M''' and locate the nearest copper ore cluster. | ||
Both '''Malachite''' and '''Chalcopyrite''' are suitable. | |||
Bring some '''Fuel''' with you (or gather it along the way) and travel to the cluster. | |||
The Drilling Rig extracts the ore corresponding to the cluster it is placed near. | |||
It has: | |||
* Unlimited vertical range | |||
* Limited horizontal range | |||
=== Preparing the Platform === | |||
Once you reach the copper cluster, build a small platform slightly above it for convenience. | |||
Create | Create a '''6×6''' platform using '''Basic Platforms'''. | ||
You can hold the block placement button to create lines or flat surfaces more easily. | |||
Before placing the '''Drilling Rig''', make sure that the tooltip at the top of the screen shows '''copper ore'''. | |||
If it shows '''stone''', the rig is placed too far from the cluster and will mine stone instead. | |||
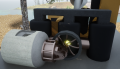
=== Connecting the Machines === | |||
The Drilling Rig has A kinetic energy input and an item output, shown as a dashed square. | |||
Place a '''Stone Chest''' at the item output. | |||
Connect a '''Stirling Engine''' to the kinetic energy input. | |||
To power the Stirling Engine, you have two options: | |||
* Dig out one block below the engine and place a '''Stone Furnace''' underneath | |||
* Rotate the Stirling Engine horizontally using '''Shift + R''' and place the furnace next to it | |||
* Or install a drill on a small 3x3 platform | |||
<gallery> | |||
File:First_Steps_DrillingRigVertical.png|Underneath design | |||
File:First_Steps_DrillingRigHorizontal.png|Horizontal design | |||
File:First_Steps_DrillingRigPlatform.jpg|Platform design | |||
</gallery> | |||
=== Starting Production === | |||
Insert '''Fuel''' into the furnace to start the setup. | |||
After the drilling progress bar fills up, the Drilling Rig will output ore directly into the Stone Chest. | |||
As long as the furnace has fuel, ore extraction will continue automatically. | |||
== Next Steps (Homework) == | == Next Steps (Homework) == | ||
Here' | At this point, you have a working basic factory and access to automation. Here are several directions you can take next to continue your progress: | ||
* '''Automate fuel production''' | |||
Coal is the most reliable option: you’ll only need one more Drilling Rig placed on a coal cluster, and it will be able to supply fuel both for itself and for other machines. Alternatively, if the nearby soil fertility allows it, you can build an [[Automatic Farm]] and supply it with water using an [[Atmospheric Condenser]]. | |||
* '''Automate copper ore processing''' | |||
Use [[Conveyor|conveyors]] to deliver ore to Smelters; to place items onto them, use [[Robot Arm]]. | |||
With the same Robot Arms, unload the smelters onto another conveyor and place a Chest at the end. | |||
Don’t forget to supply fuel to all furnaces! | |||
* '''Improve ore smelting efficiency''' | |||
Middle-click (MMB) on any copper ore and check its processing recipes. | |||
Some of them allow you to produce more than one plate from a single unit of ore. | |||
* '''Explore the machines you’ve already unlocked''' | |||
Use MMB to inspect any machine (in the Catalogue, Research tree, inventory, or after placing it in the world). | |||
Compare their input and output values, examine available recipes, and think about how you can use them right now. | |||
* | * '''Set up your first Circuit production''' | ||
This will be your first truly complex and multi-stage task, but it’s essential: research costs increase exponentially with your progress. | |||
Insert the appropriate [[Circuit]] into Computers — this will dramatically increase their computation output. | |||
== Closing == | == Closing == | ||
We hope you find this guide useful. If you have any comments or suggestions, please feel free to put them into the '''Talk''' page, and we'll review them. Also, if you have any questions, we have a Discord channel here : [https://discord.com/channels/446797368839503893/500231296178585600 General Discord Channel] | We hope you find this guide useful. If you have any comments or suggestions, please feel free to put them into the '''Talk''' page, and we'll review them. Also, if you have any questions, we have a Discord channel here : [https://discord.com/channels/446797368839503893/500231296178585600 General Discord Channel] | ||
Latest revision as of 14:44, 28 February 2026
This article covers the very first steps of progression, explaining how resource extraction and machines work, and how to build a small starter factory. New players are also encouraged to familiarize themselves with the Interface and Hotkeys articles.
Manual Resource Collection
This section explains how to manually gather the resources required for early progression.
Finding Your Way
During the early game, you will need to collect several resources manually.
To avoid getting lost, use the map by pressing M. If you do lose your way, press Escape and select Teleport to Home. This will instantly return you to the Spawner on your starting platform.
Collecting Copper Ore
First, collect at least 50 units of copper ore.
Both Malachite and Chalcopyrite can be used, as they contain copper. These resources can be found in several forms:
- Resource clusters, visible on the map and on the compass
- Surface deposits directly in the terrain
Malachite surface deposits are green, while Chalcopyrite deposits are reddish-orange.
Both clusters and deposits can be mined using the Multitool. However ore clusters never deplete when mined manually, but surface deposits are depleted when you dig them up.
Collecting Fuel
Next, collect 30 units of any fuel.
The best fuel options at the start of the game are:
- Logs — obtained by cutting down trees
- Coal — mined from clusters or surface deposits, similar to ores
Returning to Base
After collecting the required resources, return to your base manually or by using Teleport to Home.
You are now ready to begin building your first machines.
Smelting Copper
This section explains how to smelt copper and produce your first metal plates.
Preparing Stone
At the start of the game, you have access to 99 units of stone, which is sufficient for early progression.
If you need more stone, you can:
- Mine stone rocks scattered across the world
- Dig underground until you reach the stone layer
-
 There are small stones.
 -
 There are also large stones.
 -
 But there is still more stone underground.


Note that the Building Material recipe requires white stone. Red or dark stone variants cannot be used for this recipe.
Crafting the Furnace and Smelter
Return to your base and open the Inventory by pressing E. In the Catalog, select the Unlocked tab.
In the Stone category, craft the following machines by clicking on them with the Left Mouse Button:
Crafting progress is displayed in the lower-left corner of the screen. By clicking on an item currently being crafted, you can cancel its production.
Placing the Furnace

Select the Stone Furnace in your Inventory and close the Inventory.
You will see a placement preview of the furnace. To rotate the preview, press R.
Choose a location on your platform and place the furnace using the Left Mouse Button. If you are not satisfied with the placement, you can always remove the machine using the Multitool.
Notice the red circle on top of the furnace — this is its heat output.
Connecting the Smelter
Next, select the Stone Smelter in your Inventory and place it directly on top of the furnace. This connects the heat output of the furnace to the heat input of the smelter.
The furnace will now supply heat, allowing the smelter to operate.
Machine Inputs and Outputs
Tip: All machines have inputs and outputs.
- Inputs are usually displayed with a solid outline
- Outputs are usually displayed with a dashed outline
However, heat, kinetic, and electrical outputs are always shown with a solid outline. The machine tooltip clearly indicates which resources the machine accepts and which it outputs.
Smelting Copper
Finally, open the Stone Smelter using the Right Mouse Button and place the mined copper ore inside it. Place Fuel into the Stone Furnace.
If everything is set up correctly:
- The furnace will light up with a fire animation
- Molten metal will flow inside the smelter
- The smelter recipe progress bar will begin to fill
Once the progress bar is complete, you will receive the final product — a Copper Plate.
Researching New Machines
Before you can begin research, you must build and power a Computer so that it can start generating Computation.
Preparing for Research
Wait until at least 23 Copper Plates have been smelted, then collect them. After that, open the Catalog and craft the following machines:
Building the Research Setup
Now place the machines in sequence, matching their inputs and outputs by color.
- Place the Stone Furnace.
- Place the Copper Stirling Engine on top of the furnace.
- Attach the Copper Compact Generator to the Stirling Engine, connecting the yellow output to the yellow input.
- Finally, place the Copper Computer, connecting the blue output to the blue input.
Insert Fuel into the furnace at the bottom of the structure. Once powered, the computer will begin operating and generating Computation.

Unlocking Research
Open the Research tree in one of the following ways:
- Click the Research button in the lower-left corner of the screen
- Press the J hotkey
Your primary goal is to research Automatic Mining. However, this technology is locked behind other research nodes, so you must unlock them first.
Follow this order:
- Select Basic Machines and click Start Research in the upper-right corner of the screen.
- Add Automation to the research queue.
- Add Automatic Mining to the research queue.
Once all required research has been queued, all that remains is to wait for the research to complete.
Note: completed research are displayed in green. Queued research are blue. Unavailable research are red, and orange indicates research that can be completed because their dependencies are queued.
A small blue "i" icon on a research item indicates that it is required to open the Portal - thus completing the game.
Automatic Mining
After researching Automatic Mining, you gain access to automated ore extraction. From this point on, you no longer need to mine ores manually.
Preparing the Machines
To set up automatic mining, craft the following machines:
Finding a Copper Cluster
Open the map by pressing M and locate the nearest copper ore cluster. Both Malachite and Chalcopyrite are suitable.
Bring some Fuel with you (or gather it along the way) and travel to the cluster.
The Drilling Rig extracts the ore corresponding to the cluster it is placed near. It has:
- Unlimited vertical range
- Limited horizontal range
Preparing the Platform
Once you reach the copper cluster, build a small platform slightly above it for convenience.
Create a 6×6 platform using Basic Platforms. You can hold the block placement button to create lines or flat surfaces more easily.
Before placing the Drilling Rig, make sure that the tooltip at the top of the screen shows copper ore. If it shows stone, the rig is placed too far from the cluster and will mine stone instead.
Connecting the Machines
The Drilling Rig has A kinetic energy input and an item output, shown as a dashed square.
Place a Stone Chest at the item output.
Connect a Stirling Engine to the kinetic energy input. To power the Stirling Engine, you have two options:
- Dig out one block below the engine and place a Stone Furnace underneath
- Rotate the Stirling Engine horizontally using Shift + R and place the furnace next to it
- Or install a drill on a small 3x3 platform
-
 Underneath design
 -
 Horizontal design
 -
 Platform design


Starting Production
Insert Fuel into the furnace to start the setup.
After the drilling progress bar fills up, the Drilling Rig will output ore directly into the Stone Chest. As long as the furnace has fuel, ore extraction will continue automatically.
Next Steps (Homework)
At this point, you have a working basic factory and access to automation. Here are several directions you can take next to continue your progress:
- Automate fuel production
Coal is the most reliable option: you’ll only need one more Drilling Rig placed on a coal cluster, and it will be able to supply fuel both for itself and for other machines. Alternatively, if the nearby soil fertility allows it, you can build an Automatic Farm and supply it with water using an Atmospheric Condenser.
- Automate copper ore processing
Use conveyors to deliver ore to Smelters; to place items onto them, use Robot Arm. With the same Robot Arms, unload the smelters onto another conveyor and place a Chest at the end. Don’t forget to supply fuel to all furnaces!
- Improve ore smelting efficiency
Middle-click (MMB) on any copper ore and check its processing recipes. Some of them allow you to produce more than one plate from a single unit of ore.
- Explore the machines you’ve already unlocked
Use MMB to inspect any machine (in the Catalogue, Research tree, inventory, or after placing it in the world). Compare their input and output values, examine available recipes, and think about how you can use them right now.
- Set up your first Circuit production
This will be your first truly complex and multi-stage task, but it’s essential: research costs increase exponentially with your progress. Insert the appropriate Circuit into Computers — this will dramatically increase their computation output.
Closing
We hope you find this guide useful. If you have any comments or suggestions, please feel free to put them into the Talk page, and we'll review them. Also, if you have any questions, we have a Discord channel here : General Discord Channel